Getting Started with Sigil
Workspace and Layout
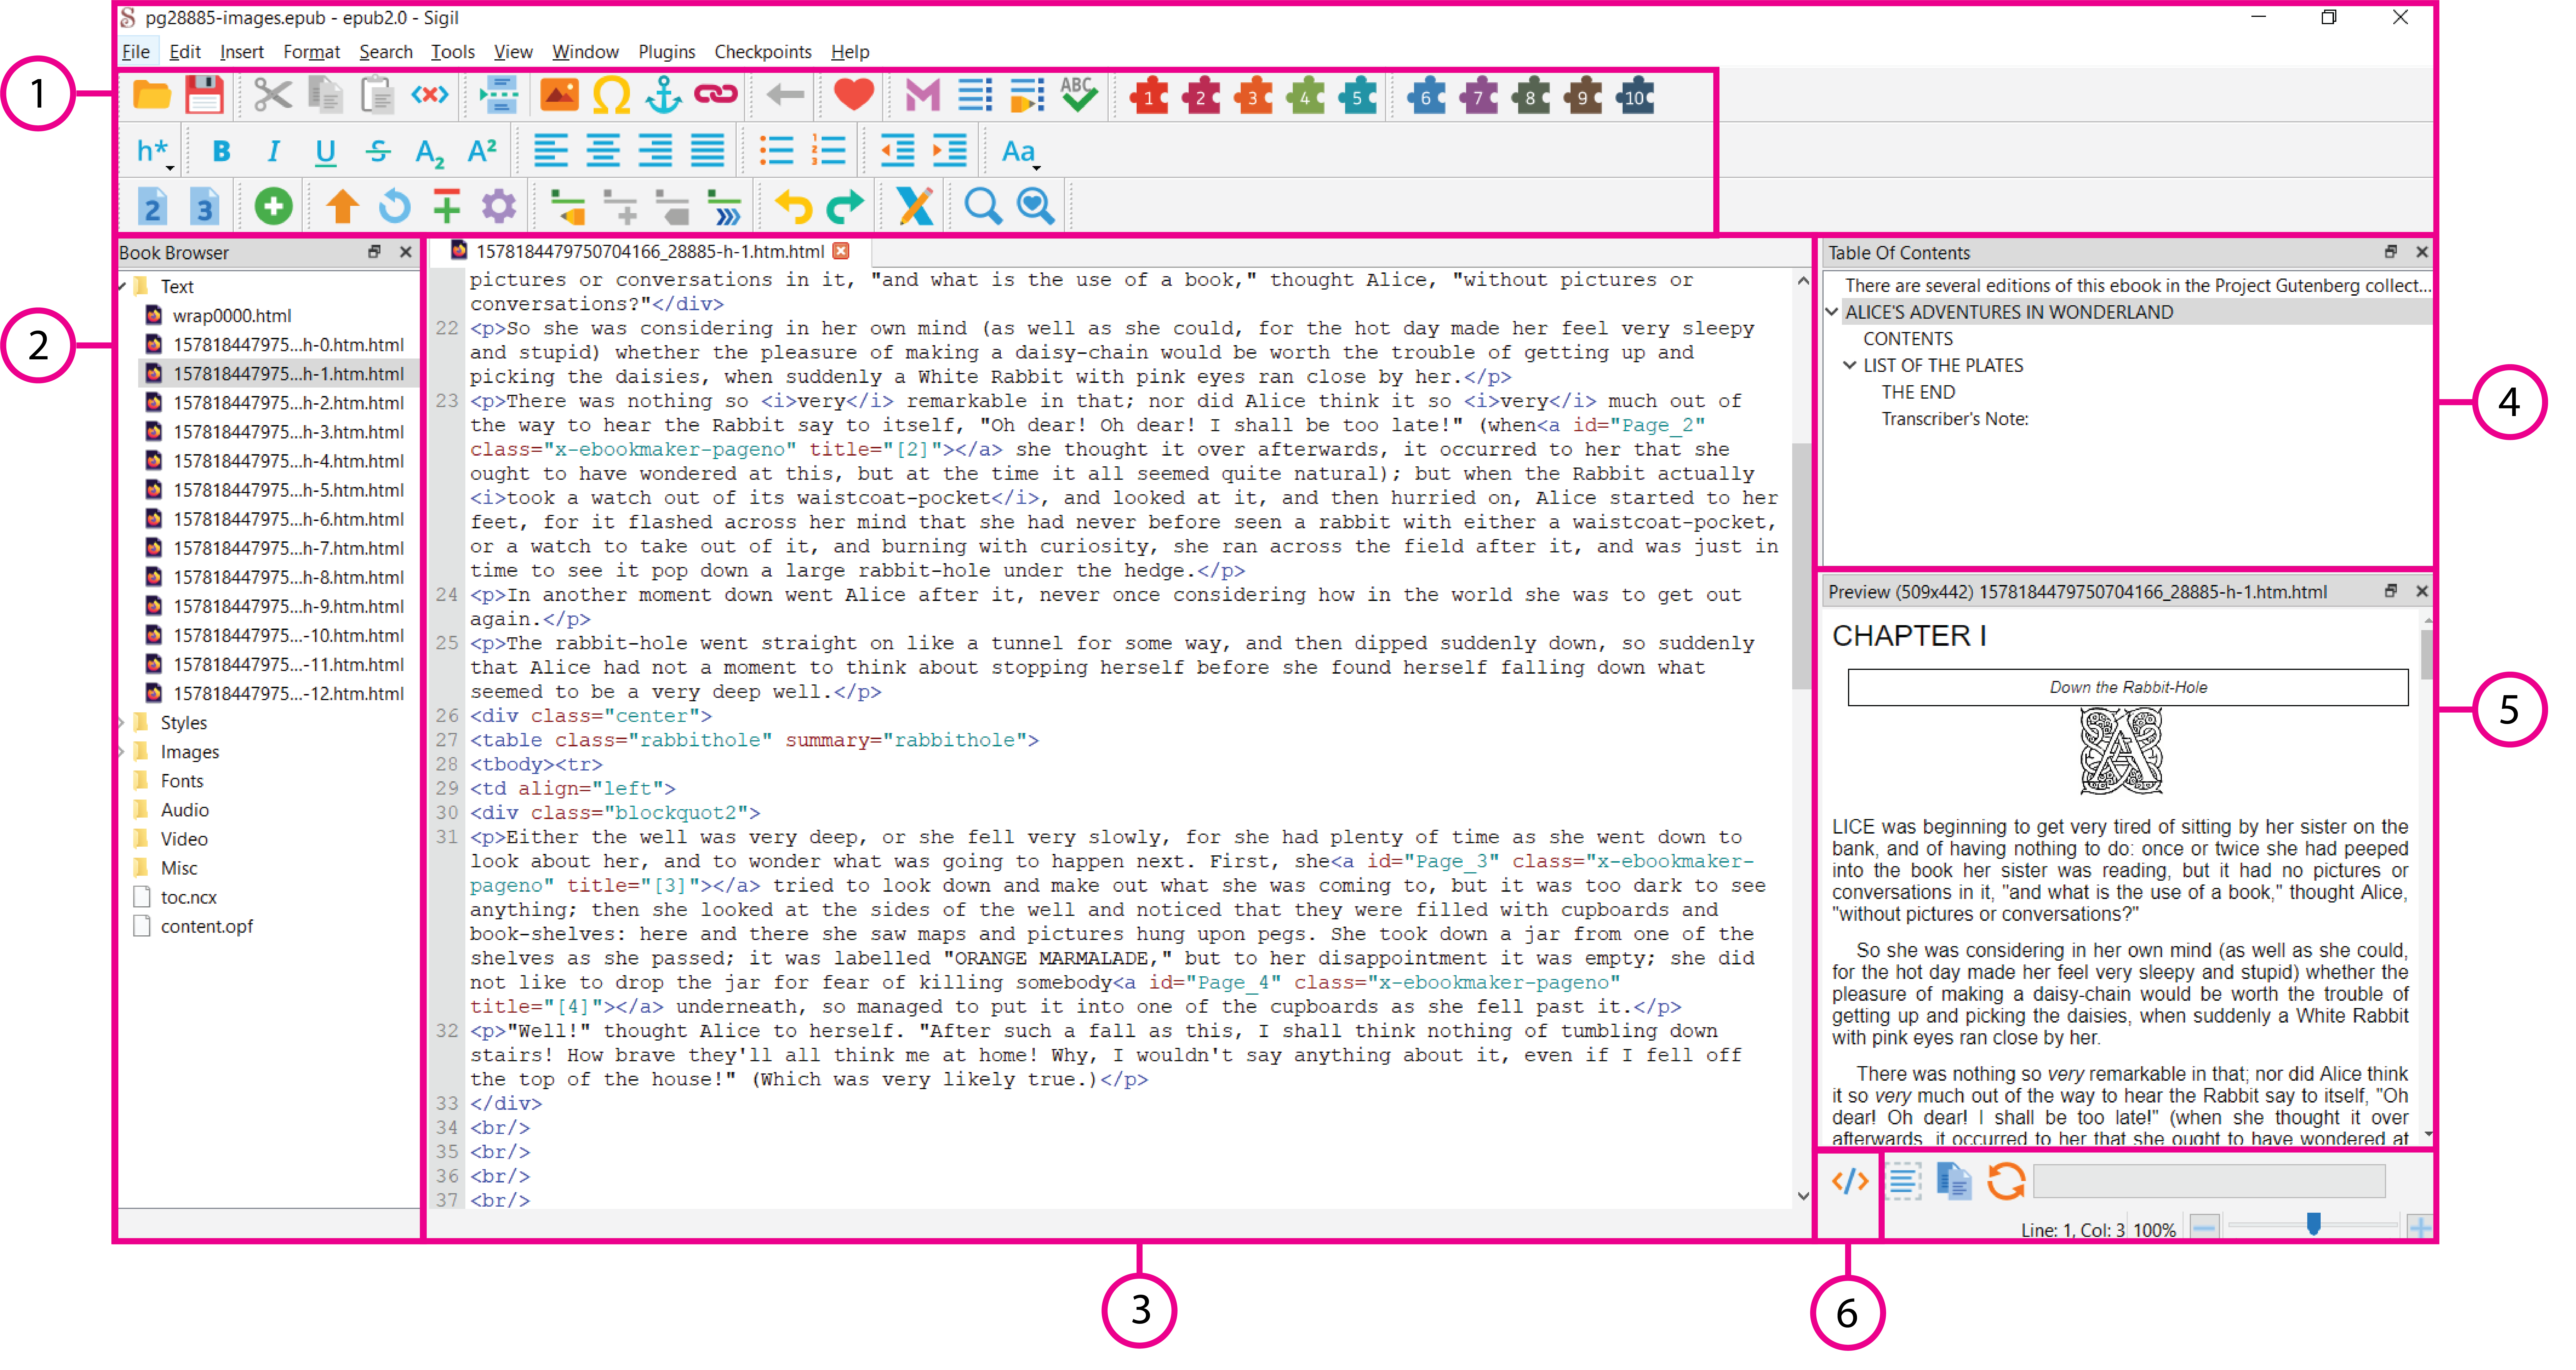
- Main/Formatting Toolbar
Contains all the tools needed to format and import assets into your EPUB. Toolbar buttons are movable to provide quick access to many menu items. The Main Toolbar contains buttons used for shortcuts to Sigil’s main features, such as New, Open, Add Existing Files, Save. The Formatting Toolbar contains buttons used mostly for formatting text, such as H1, H2, Bold, Numbering, Bullets, etc. - Book Browser
All the files that make up your EPUB can be accessed using Book Browser. Your text files, images, as well as any fonts or style sheets or other files, are organized into folders. - Code View
Code View allows you to directly edit the XHTML code included in your EPUB and is the most common way to edit files for advanced users. - Table of Contents
Sigil allows you to generate a table of contents for your eBook. A table of contents provides a road map to help readers navigate your book. - Preview
Preview is a movable window that gives you a dynamically updated read-only view of what appears in Code View. It is a preview of what your EPUB will look like on an E-reader. - Inspect Page
You can also inspect your code and styles by clicking the Inspect button (</> icon) in the toolbar at the bottom of Preview.
Creating a New Project
Open Sigil
Double click the Sigil icon on the desktop to open the program. This automatically creates a blank document called untitled.epub.
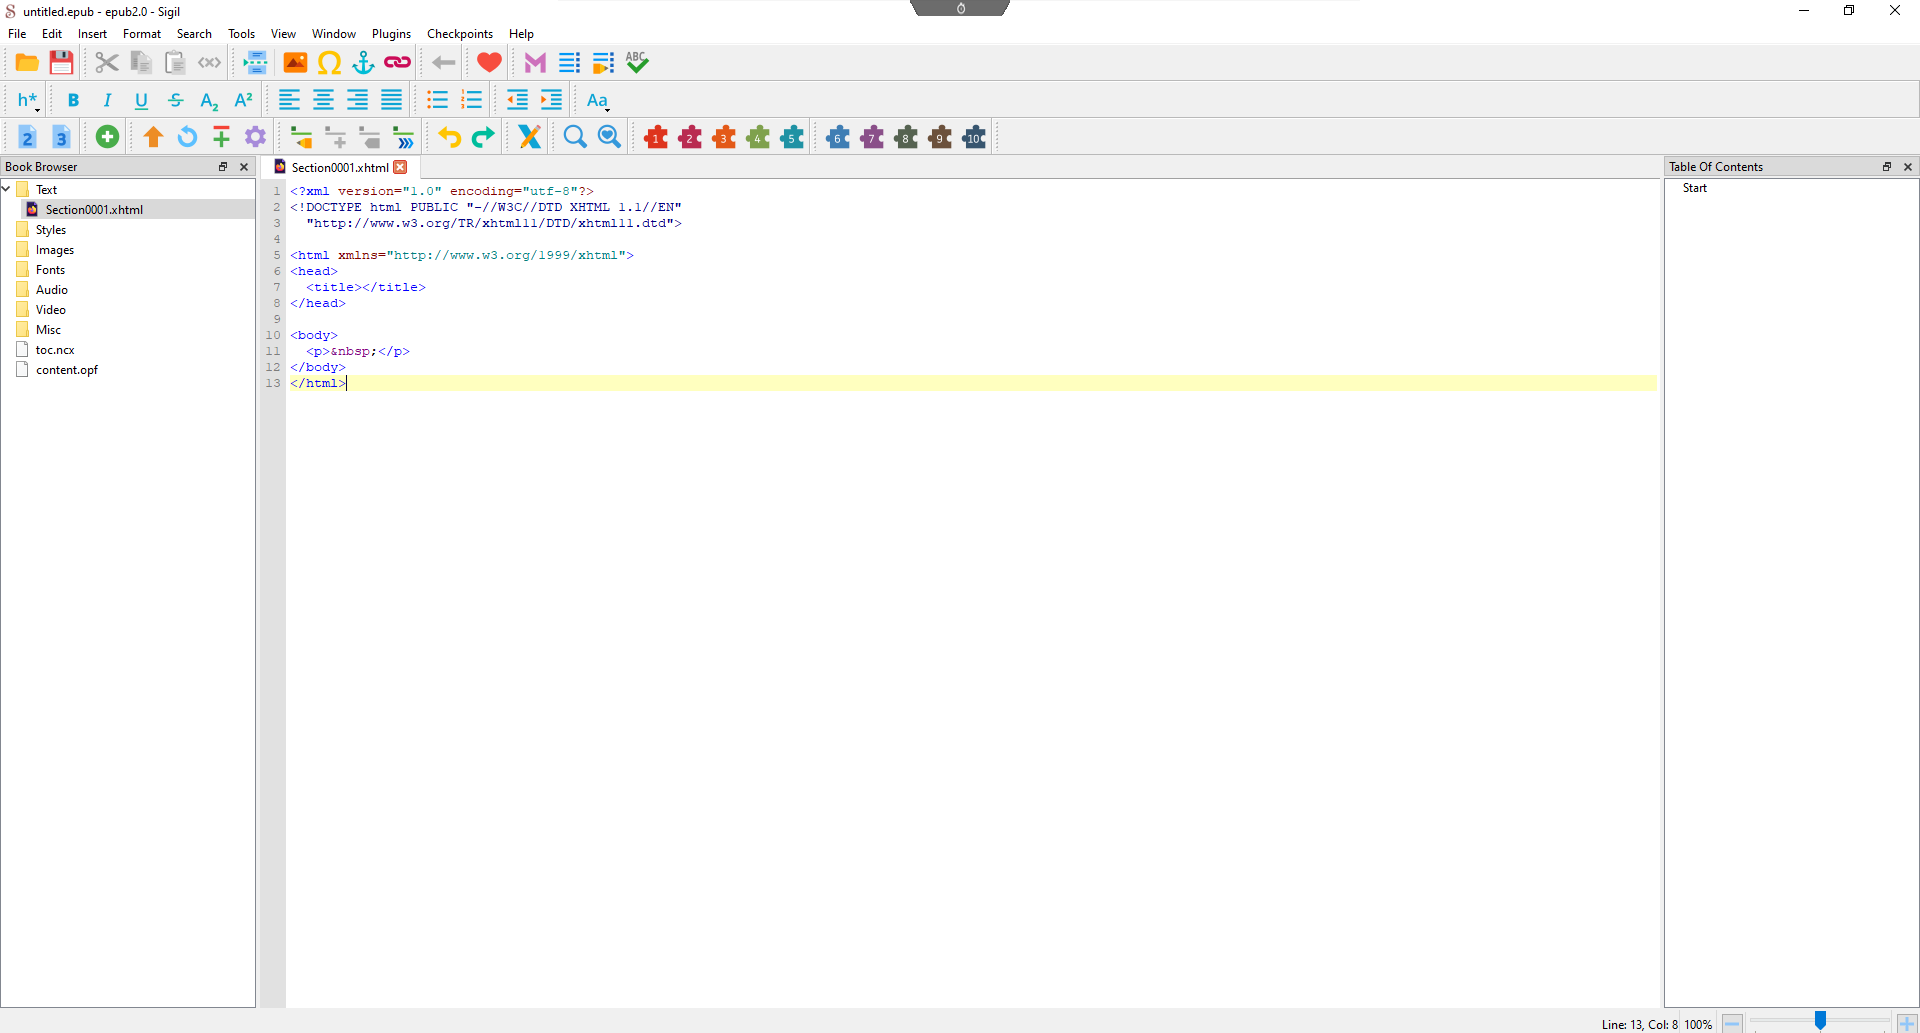
The Book Browser window on the left shows you all of the files in your EPUB. The code view window is in the center, and a Table of Contents window is on the right to show you any chapter titles that you have defined.
When you open Sigil, the preview window will default to being hidden. To view it click on view>preview or hit the F10 key. You can drag it around to pin it / resize it.
Importing your Manuscript
There are different ways of importing your text into Sigil depending on the file format it is currently in and how / where you want to format your text. There are advantages and disadvantages to each of these methods:
- .txt file (plain text)
- .htm .html and .xhtml files (Sigil converts all text .xhtml and works with that format)
- .epub file (ebook)
- .docx file (Microsoft Word document)
- copying and pasting
Opening a .txt, .html, or .epub file
Sigil will open .txt .html and .epub files. To do this, in file menu click File > Open. Then navigate to the file you want to use, and select it. (NOTE: In the open menu, you will need to change the file filter to "all files" to be able to see these additional formats, as by default the search will be filtered to epub files)
With an epub file, all its components are loaded automatically. including XHTML, images, stylesheets, metadata, etc.
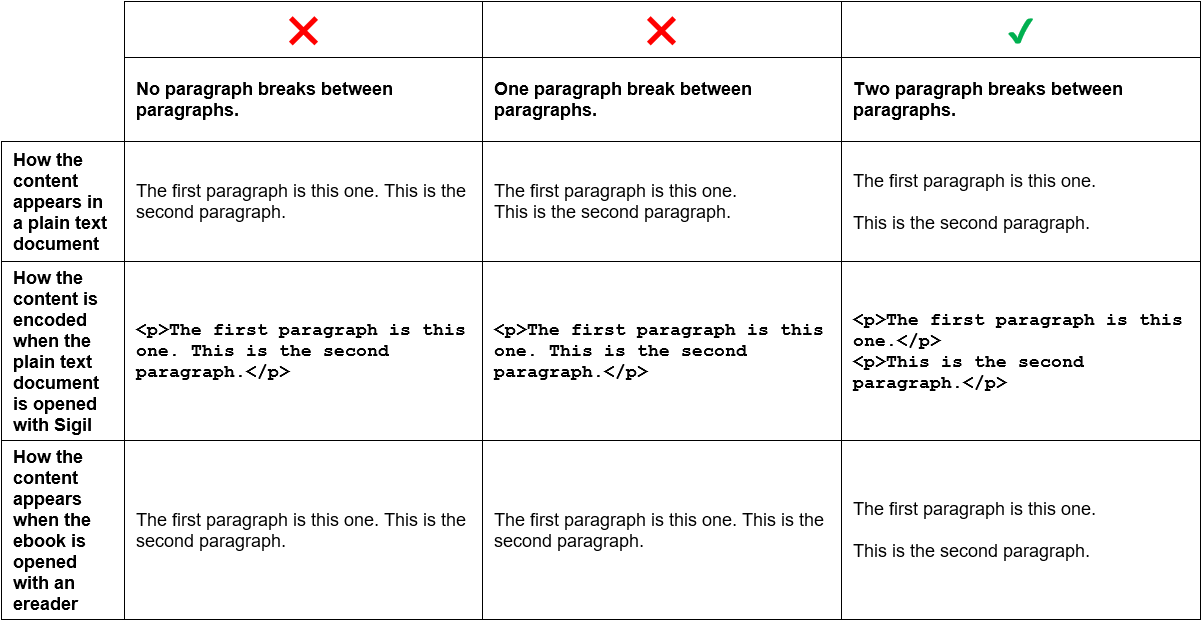
With a txt file, paragraphs must be separated by two full paragraph breaks in the original text file to have them split into separate paragraphs automatically in Sigil. See Image below
Converting a .docx file
Sigil cannot directly open a .docx file. You will need to save your .docx file as either a TXT or HTML file first and then open that converted version in Sigil using the above instructions in the previous subheading.
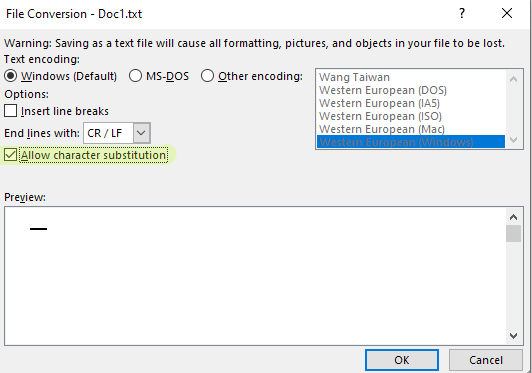
If you choose to save your .docx file as .txt file, you should enable the "Allow character substitution" checkbox that appears in the below menu after you hit save. Once saved, open that .txt file in Sigil. (Note: all formatting is lost when converting your .docx file to a .txt file.)
If you have already done ALL your formatting in Word and don't want to have to redo it in Sigil, open your .docx and save it as a Web Page, Filtered .htm / .html. Then open that file in Sigil. Please note that using this method will preserve your original formatting, but will add much additional code which can make it difficult to do any additional formatting. Therefore we suggest only using this method if you finished all your formatting in Word beforehand and just want a quick conversion to epub.
Copying and Pasting
- To import your manuscript into Sigil and then do your formatting in Sigil, you may copy and paste your text into Sigil. Select your text in the document (Ctrl+A) and then copy it on the clipboard: File ⇒ Copy or (Ctrl+C).
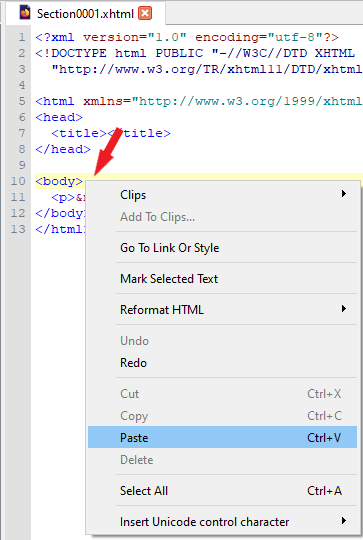
- Open the Sigil window and paste the entire manuscript into a blank .xhtml document: Edit ⇒ Paste or (Ctrl+V). You should paste the text in between the <body> and </body> tags.
Note: A publisher may have specific instructions on how to format your ebook or they may take care of publishing your ebook for you.
Importing Images
Import Images
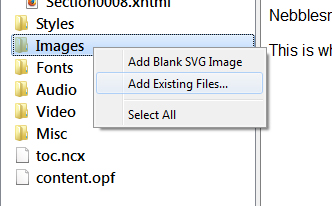
If you want to preload all the images you will insert in your ebook at the beginning, right click on the Images folder in the Book Browser and select Add Existing Files. Choose all the images you want to import and click Open.
Note: Sigil supports .jpg, .png, .gif and .svg file formats.
When you are ready to insert an image at a certain line in your book, you can click on the "Insert File" button in the toolbar.

At this point, you can insert previously loaded images or click on "other files..." to load a new one to your project at this juncture.
It is highly recommended that your images are not larger than 800 pixels (H) and 600 pixels (W) and saved at a resolution of 72ppi for optimal viewing on eReaders. This ensures your eBook stays at a reasonable size. Large images will take longer to load on e-ink eReaders. Color images will automatically render in black and white on these devices so there is no need to convert your images into grey scale. Images should be in RGB color profile.
You also have the ability to import fonts, audio, and video files, as well as custom CSS and Javascript (for styling HTML) the same way as images. Click on the folders in the Book Browser to expand each folder and see all of your imported files. Keep in mind that audio, video and Javascript are only supported in EPUB3 format.
Alternative (Alt) Text for your Images
Alt text describes images to visually impaired readers who are not able to see them. The best practice for writing Alt text is to describe your images as specifically and briefly as possible. (alt text should be no longer than 125 characters to work best on screen readers for the visually impaired.)
XHTML, the code language used in Sigil, always requires Alt text. It will default to the image name, unless you change it manually. To change alt text, in the Code View, look for image tags that show up as <img alt="the name of the image'> Then Replace the "the name of the image" with Alt text, wording to describe the image.


Saving your Project
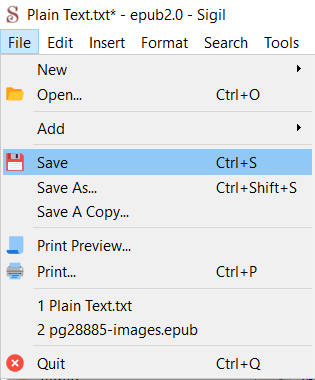
It is a good idea to save your project regularly as you are working. To save your EPUB, click the Save button or go to the menu File > Save.
The format it will save as is a standard .epub file. This file can be opened later for further editing on Sigil but can also be sent to an ereader to read or test.
Validating Your Ebook
Validating and Testing your EPUB
Validating and testing your EPUB before you share it with family, friends, or a wider audience is an important step.
Validating
Sigil has a built-in EPUB Validator, but you can also upload your EPUB to a web-based validator.
Files that are 10 MB or smaller in size can be validated a web-based EPUB validator. For files that exceed this size, a desktop version of EPUB Check is available as a free download.
- Open Epub Validator in your browser.
- Upload the EPUB file you want to inspect and click the Upload and Recheck file button.
- This service will check to see if it complies with standards set by the World Wide Web Consortium (W3C). If your EPUB does not meet these specifications, it will return a message listing all the issues found in your EPUB. Each error message explains the problem and specifies the file and line(s) of code that you can refer to when troubleshooting.
- Once your EPUB file contains no errors, you will get a Results message letting you know. You can now proceed with the next step: publishing and distribution.
Testing
If you want to view and test your new Ebook in a free ereader Adobe Digital Editions is a great option. Here is a resource on some other good options:
Adobe Digital Editions
- Download Adobe Digital Editions
- Open Adobe Digital Editions (ADE).
- Add the eBook by dragging and dropping the EPUB file into ADE or selecting FILE > ADD TO LIBRARY from the menu.
- The EPUB can now be read and tested
