Layers, Selections, and Combining Images

Layers
Photoshop allows you to stack multiple images on top of each other to combine elements into complex images. These elements are known as layers. Layers can be moved around in relation to the layers below it. Any effects, filters or tools you use will only make changes to the selected layer. Layers can include images, text, and effects.
Look at the image above. Notice how the photo of sunflowers is in front of the photo of a sheep. Likewise, the photo of a sheep is in front of the photo of mountains. This is due to layer order. The top layer of this project is a text layer of the word “postcards” appearing in front of all other layers. Currently, ‘Layer 2’ is highlighted. This means that ‘Layer 2’ is the selected layer.
Layer Tips:
You can rearrange the layer order by dragging and dropping layers into new locations on the layers panel.
Selecting the ‘eyeball’ turns the visibility of the layer on or off.
Double clicking the layer name allows you to rename a layer.
Locking a layer will prevent changes being made to the selected layer.
See Adobe Photoshop help page for video guides and more information on layers.
Selection Tools
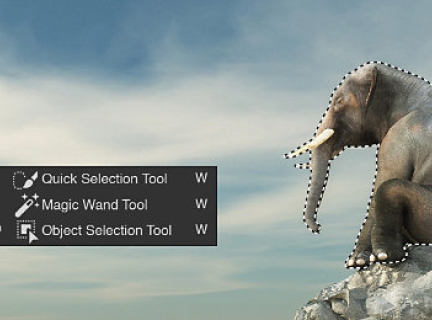
Selection tools allow you to work with a part of an image rather than the entire image. When an area is selected it will be surrounded by a moving, black and white dotted line (this is sometimes called ‘marching ants’).
Any changes or edits made will only be applied to the selected area of the selected layer. You can also delete the selected area or copy and paste it to create a new layer.
Photoshop offers a variety of selection tools. Some selection tools will be more effective than others for any given situation, so it is helpful to know how to use a variety of tools.

Selection Tools (and How to Use Them):
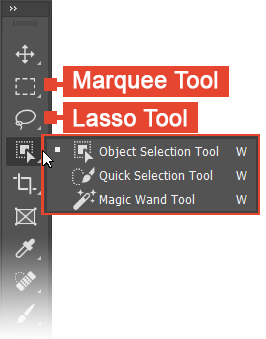
Marquee Tool: Select an area in the shape of a rectangle or oval.
Lasso Tool: Draw a shape and everything within the shape’s boundaries will be selected.
Object Selection Tool: draw a rectangle or shape around your chosen object and software will automatically select the object within these boundaries.
Quick Selection Tool: Click and hold your mouse while drawing over the area you are selecting. Photoshop will find the edges of the object to automatically select it. The Quick Selection tool works best for selecting distinct objects with clear outlines.
Magic Wand Tool: Click on a part of your image and areas based with similar colours will be selected. Tolerance controls how similar or dissimilar the selected colours will be.
Selection Tips:
Adding To and Subtracting From a Selection:
Press the “SHIFT” key while selecting to add to the current selection.
Press the “ALT” key while selecting to subtract from the current selection.
We do not need to use the same selection tool to add to or subtract from a selection.
Select Inverse: Right click on selected area and choose “select Inverse” to select the opposite of the selected area.
Deselect: Press “CTRL” + “d” or right click and choose “deselect."
