Create an Ebook Cover
Self-Publishing Resources
The following steps illustrate how to design an ebook cover using Adobe InDesign.
Creating a New Document
Create a new document in InDesign
Go to File > New > Document, and fill in the dialog box as shown below. These are the default settings for creating a document for viewing on an iPad, and this size and shape will work just fine for other eReaders as well. Click OK to open your new document.
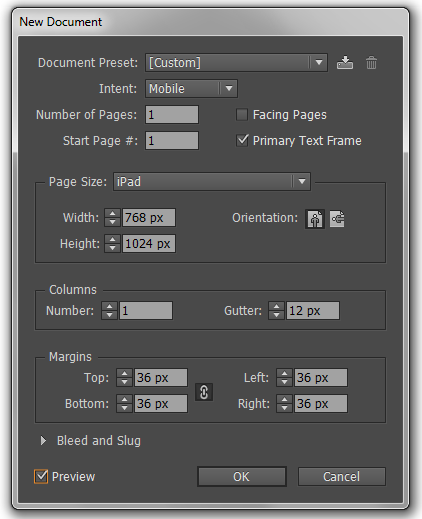
Note: Be sure to set the orientation to Portrait
Your screen in InDesign will look something like this:
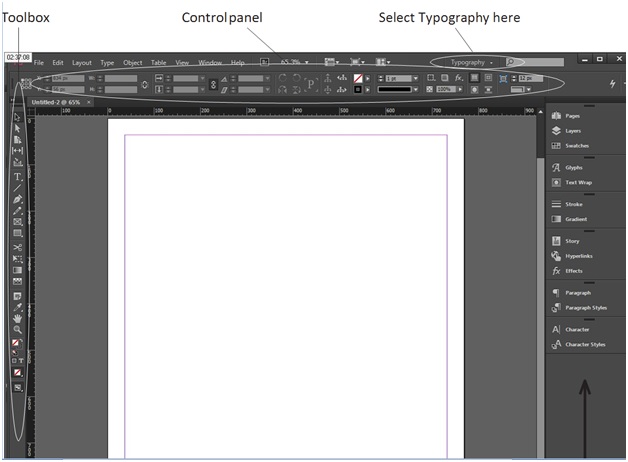
Select Typography from the drop-down menu at the top, and that will provide you with the panels you’ll need in the dock on the right side of your screen.
Now save your file. Go to File > Save As, then click the New Folder button and type “Book Cover” in the box, and hit Enter. Now enter a name for your file in the File Name box. Select your USB memory stick on the left (this will show up below the “D-Drive”). And remember to save often during the process of designing your cover.
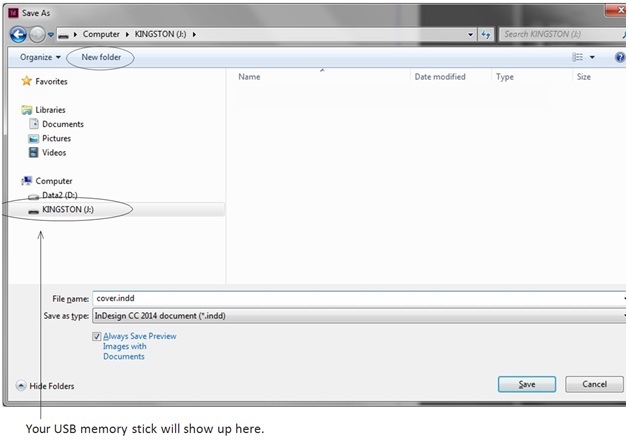
Once you’ve saved your document onto your memory stick, you can easily save it each time you make a change by using the keyboard shortcut for Save, CTRL + S.
And it’s never too early to learn how to reverse or undo mistakes. As you’re working on your cover, you’ll find yourself in “oops” situations from time to time. It’s easy to undo the last few things you did using the Undo keyboard shortcut CTRL + Z. Undo once, and you’ll undo the most recent step you took. Or, you can Undo several times, and go back several steps. If you Undo too many steps, you can re-do those steps by pressing CTRL+ SHIFT + Z. This also comes in handy for seeing whether you prefer a change you made, or whether it was better the way it was.
Adding Images
Placing an Image
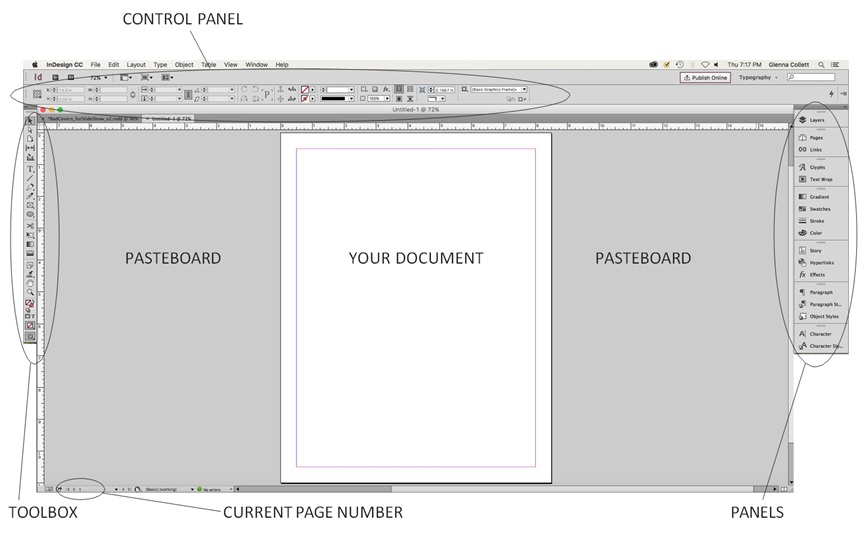
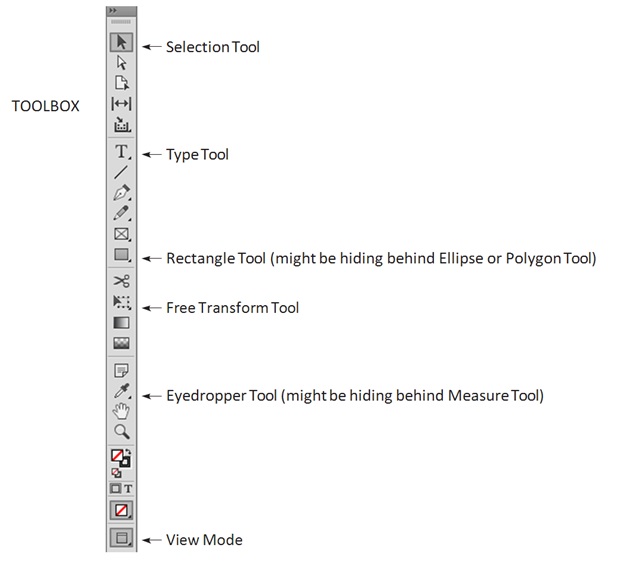
Choose the Selection Tool, which is the black arrow at the top of the toolbox (on the left side of the screen). Go to File > Place, and select your USB memory stick on the left.
Select your image and click it once to open it.
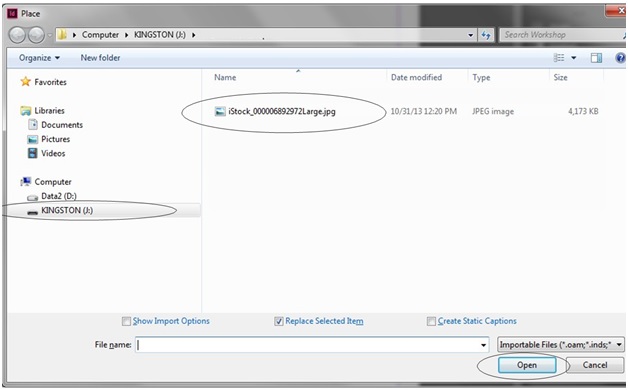
You’ll see a miniature version of the image attached to your mouse pointer. Move your pointer to the upper left part of your page and click. Your image will appear on the page. It may not be the size you want, but you’ll change that in the next step.
Sizing and/or Cropping the Image
Notice that your image has a light blue border. This is called a frame. In InDesign, all images and all type sit in frames. You can change the size and shape of a frame at any time by dragging any of the handles using the Free Transform Tool, both found in the Toolbox on the left of your screen. The Free Transform Tool is best for making large adjustments to an image, such as reducing or enlarging it, and rotating it. The Selection Tool is best for fine-tuning the size of your image frame and cropping the image. Either tool can be used to drag an image on the page. Take a few moments to experiment with these tools following the instructions on the next page (you can always Undo your changes).
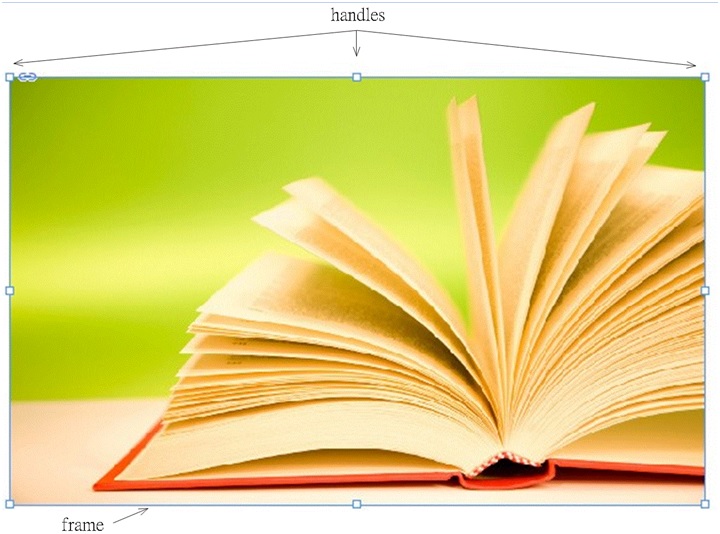
Note: If your image is larger than your screen right now, hold down the CTRL key and press - (the hyphen key) repeatedly until your page is small enough to see all four corners of the image frame. That way you’ll have access to all the handles on the frame. You can easily return to Full Page View later by pressing CTRL + 0 (zero).
To enlarge your page anytime, press CTRL + =. To make it smaller, press CTRL + - (hyphen).
Try changing the size of your image:
- Click on the Free Transform Tool in the Toolbox on the left of your screen to select it.
- Next click on the image to select it. You’ll see the image frame with its handles appear.
- Grab a handle in one corner of the image frame, and hold down the Shift key at the same time.
- Now drag the corner of the image to resize it so it fits nicely on the page. (Holding down the Shift key keeps the image’s proportions intact.)
Try rotating your image:
- Still using the Free Transform Tool with your image selected, hover around the outside of your image and you’ll see a curved arrow. Drag vertically or horizontally and you’ll see your image rotating. If you let go of the mouse, your image will stay at the current rotation. To return to the original orientation, click CTRL + Z to undo.
Try cropping your image:
- Using the Selection Tool, click on the image to select it, then drag any handle on the frame to reshape the frame. This doesn’t resize the image, but instead crops it.
It’s perfectly okay if your image is larger than the page. Nothing that’s outside the edges of the page is going to show on your cover.
Checking image usability
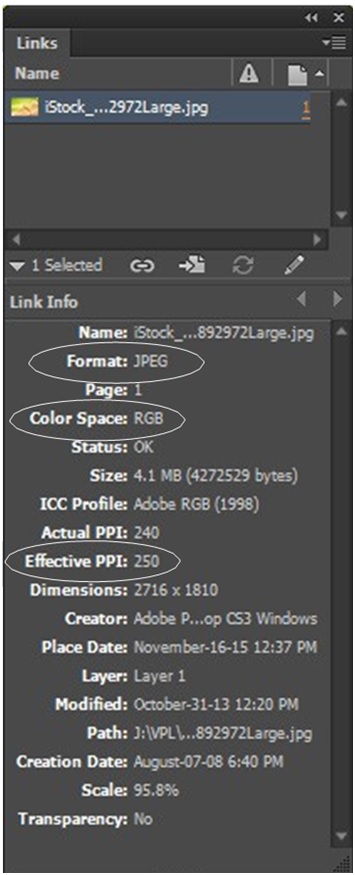
Using the Selection Tool, click on your image to select it. ()
Open the Links panel by clicking Window > Links (see right).
Check these things to make sure your image is suitable: Format—should be JPG, JPEG, PNG, PSD, or TIF. Most likely the format will be JPG, JPEG, or PNG, as those are typical formats of digital images from cameras or scanners. If it has a PSD or TIF format, the image has come from Photoshop.
Colour Space—should be RGB. The other colour space is CMYK, which is used for exclusively for print.
Effective PPI—should be 72 or higher. If the effective PPI is lower than 72, then you’ll need to shrink the size of your image (see “changing the size” above) until it’s at least 72 ppi.
Using View Modes
Let’s look at your cover so far. Click on the bottom icon in the Toolbox and you’ll see a fly-out menu with Normal and Preview at the top. So far you’ve been working in Normal mode, where you can see the edges of your page, the margins, and the frame around your image. Select Preview, and you’ll see your cover without those things. It’s best to work in Normal mode, however, so click on the same icon and select Normal. You can go to Preview mode anytime to admire your work, but remember to return to Normal mode after that.
Adding Text
Add a Layer
In the next step, you’ll add text to your cover. But first you need to add a layer to put it on. Layers are like transparent plastic sheets that you place type or images on. You can see through the transparent sheets to whatever is below them. Keeping type and images on different layers makes it much easier to select things when you want to move them. To make a new layer, do the following:
- Open the Layers panel by clicking on it—it’s on the right side of your screen near the top of the dock. You’ll see that you already have Layer 1 in place. Anything you have placed on your page so far is on this layer. (Select your image with the Selection Tool and you’ll see that the frame is blue, the same blue as Layer 1.
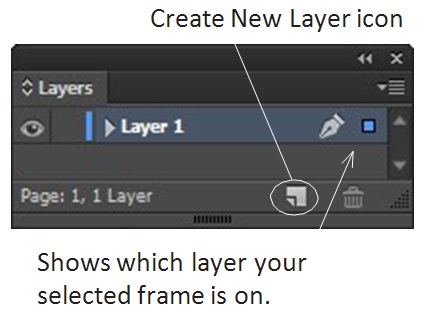
You’ll also see that the box at the right of Layer 1 is blue when your image is selected.)
- Click on the Create New Layer icon (see above right) at the bottom of the panel. Layer 2 will appear above Layer 1 in the panel. It’ll be red, and anything you place on Layer 2 will have a red frame around it.
- Double-click Layer 2 to open the Layer Options dialog box, type “Type” in the Name box, then click OK.
This layer will hold all your type frames—book title, author’s name, etc.
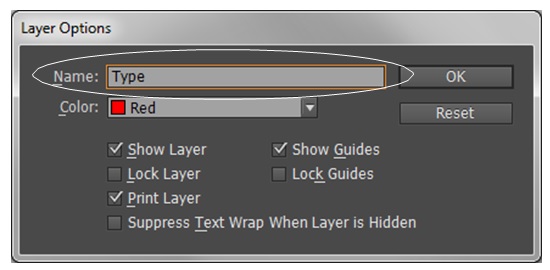
Begin to understand how layers work by clicking on each layer in turn and noticing how one or the other is highlighted in the Layers panel. The highlighted one is currently active, so when you want to work with type, activitate the Type layer, and when you want to work with your image, activate Layer 1.
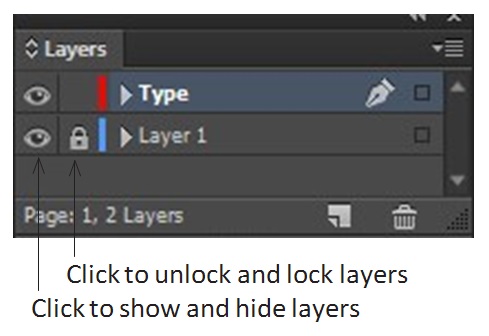
- At any time, if you’re having trouble selecting the correct object on your page, you can lock the other layer(s) by clicking in the box to the left of the layer name. A lock icon will appear.
- You can also hide a layer by clicking on the eye icon. That will help you see what is on the layer. Anything on a hidden layer will not show up on your final cover.
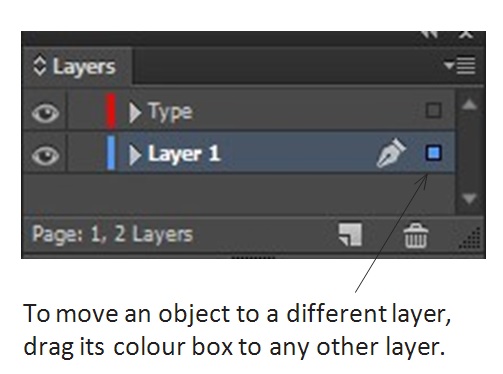
If you place something on the wrong layer by mistake, select the item (using your Selection Tool), and you’ll see a colour box appear on that layer. To move the object to a different layer, simply drag the colour box onto the new layer.
You can also change the order of the layers. The layer at the top in the Layers panel is above the others in the stack. Grab the layer name and drag it down or up and the order of layers will be changed.
Adding the Book Title and Author's Name
Whenever you add type to an InDesign document, you first create a text frame and then type in it. The shape of the frame can be changed at any time.
Select the Type Layer first, then select the Type Tool (T) from the Toolbox.
Click and drag to make a rectangle across the cover, then type your book’s title. The type size will probably be quite small.
Using the Text tool, select all of your title type by dragging over it, or by triple-clicking. It will turn white and be highlighted with a black background. Look at the Control panel in the upper left of the screen and find the Font Size (see right). Change the size of the type by either typing a higher number in the upper box or click on the up arrow until you get a size that is big but still fits on your cover.

Now switch to the Selection Tool and drag the corners of your frame until it’s the right size. If you’d like your title to be centered on the cover, align the sides of the type frame with the sides of the cover, then switch back to your Text Tool, select your title, and choose Align Center from the Control panel.
Using the steps above, create a new text frame for your subtitle (if any) and another for the author’s name.
Finding the Right Typeface
Select your book title using the Type Tool. Look in the Control panel and see what typeface you’re using now. Click on the arrow to the right of the typeface name and a list of fonts will appear. Each one shows a sample of what it looks like. Click on any font that looks interesting, and your title will appear in that font.

Here’s an easy way to try every available font installed on the computer: with your title selected, click on the arrow to the right of the current typeface in the Control panel. Then click on the first font in the alphabetical list to select it (probably Aparajita). Now click once on the current typeface in the Control panel to highlight it in blue. Use your down arrow key to scroll through the whole font list, and see your title display in each font. Make a list of all the fonts that have potential for your book title.
There are three categories of fonts: serif (classic), sans serif (modern), and display.

Serif fonts (left) have strokes added to the basic letterform. Sans serif fonts (center) don’t have any additions to the basic letterform. Display fonts have character and are used to evoke a specific mood or era. Choose a typeface that fits with your genre of book. If you’re unsure, look at other books in your genre to see what fonts are used.
STEP 9: Making Refinements to the Type
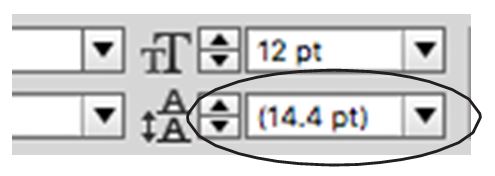
Now that you’ve chosen typefaces for your type, if any type is too large or too small, just select it with the Type Tool and change its size using the up or down arrows to the left of the Font Size box in the Control panel (see Step 6).
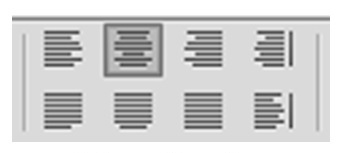
You might want to center your type or make it align to the left or right. Put the type cursor anywhere in the type and click on the desired alignment in the Control panel.
Add or subtract space between the lines of a multi-line title or subtitle by changing the numbers in the leading field of the Control panel (see right).
Adding Colours and Effects
Creating Colours
There are two ways to create colours to apply to frames and type: 1) by creating a colour manually right in the Swatches panel, and 2) using the Eyedropper Tool, which “picks” a colour right out of your image.
First take a look at the Swatches panel (it’s in your dock on the right). Click to open it, and you’ll see several colours already there. Any colour with brackets around it is a default colour and cannot be changed. But you can make new colours by doing the following:
- Click on the 3 horizontal lines at the top right corner of the Swatches panel (the “fly-out menu”), and choose New Colour Swatch at the top of the drop-down list.
- In the Colour Type menu, choose Process and in the Colour Mode menu choose RGB (see right).
- Now use the sliders (or type a value in the boxes) to create a new colour swatch. Click OK and the new swatch will appear at the bottom of the list of colours in the Swatches panel.
Note: You can also grab a colour from the image you placed on your cover. Any colours taken from the image are guaranteed to look good with your image.
- Select the Eyedropper Tool from the Toolbox on the left (it might be behind the Measure Tool).
- Notice that the little eyedropper points down to the left and it’s empty.
- Use the Eyedropper Tool to click on one spot in your image. Now the eyedropper points down to the right and it’s half full with the colour you just “picked.”
- There are a few things you can do now with the colour loaded in the Eyedropper Tool. If you drag across text, the colour of the text will change to the colour you picked. If you click the New Swatch icon at the bottom of the Swatches panel, the colour will be added below the existing colours.
- To choose a new colour, clear the Eyedropper Tool by clicking on it on the Toolbox.
Applying Colours to Type
Using the Type Tool, select the type you want to colourize.
- Open the Swatches panel. Find the Fill and Stroke icons at the top left of the panel (see right). Fill controls the colour that fills the inside of type or a frame, and Stroke controls the colour outlining type or a frame.
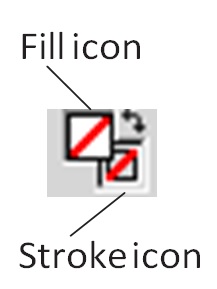
- Make sure the Fill is in front of the Stroke (see example to the right). If it isn’t, simply click on the Fill icon and it will move to the front. Either or both of the icons may already be filled with a colour but you can ignore that.
- Now click on any colour in the Swatches panel to load that colour into the Fill icon, and your type will change to that colour too.
- To add an outline around your type, select it with the Type Tool, then click on the Fill and Stroke icons again in the Swatches panel to get the Stroke icon to come to the front.
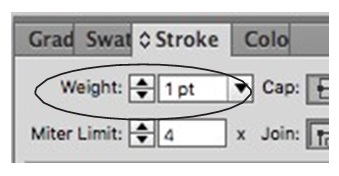
- Select a colour from the Swatches panel, and an outline will appear around your type. If it doesn’t appear, open the Stroke panel and insert a number in the Weight field—start with 1. You can also use the Weight field to make the outline heavier (fatter) or lighter (skinnier).
Making Blocks of Colour
You might want to add a block of colour behind your title, across the top or bottom of your cover, or as a background to your whole cover. Here’s how to make a coloured shape:
- Select the Rectangle Tool from the Toolbox. It might be hiding behind the Ellipse or Polygon Tool. If so, click and hold the visible tool until a list appears, then select the shape you want.
- Click and drag anywhere on the page to make a rectangle shape. If you want an ellipse, simply do the same thing with that tool, and you’ll get an ellipse. To make a square (or a circle), hold down the Shift key as you drag.
- Adjust the shape of the rectangle or ellipse using the Selection Tool. Select the shape, then grab a corner of its frame and drag until you’re satisfied.
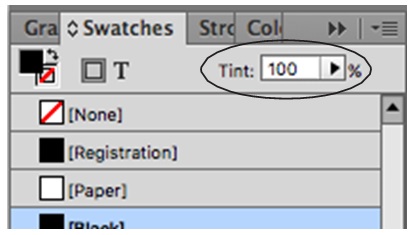
- Apply colour to the shape by keeping it selected and going to the Swatches panel. Choose a colour for the fill and the stroke (review Step 10 if necessary). If you like, use the Tint slider to make the colour less intense.
- Now position the shape where you want it and adjust it again as needed.
You may want to make a new layer for your shapes (see Step 6) and place it below your Type layer and above Layer 1 in the Layers panel. That way your shapes will be behind your text and in front of your image. Or, if you’re adding a colour background to your whole cover, create a new layer and drag it to the bottom of the Layers panel. That way, when you add your background colour to that layer, it’ll be behind the text and images on the cover.
Note: Don’t forget to save your progress (CTRL + S).
Adding Effects
There are lots of effects you can add to type and images, such as drop shadows and transparency. All these effects are available in the Effects panel in your dock on the right. To add effects, you’ll need to select a frame using your Selection Tool (if you select type with your Type Tool, the Effects panel will appear grayed out and unusable).
- To add an effect, use the Selection Tool to select the frame of the type, image, or shape that you want to add an effect to.
- In the Effects panel, click on the fx symbol at the bottom, and click an effect on the list to open the Effects dialog box (see below). Notice there are lots of effects listed on the left, and when you select an effect it’s highlighted in blue and its settings are displayed on the right. Shown below are typical settings for a drop shadow.
- Click the Preview box at the bottom left so you can preview the effects you choose as you go along.
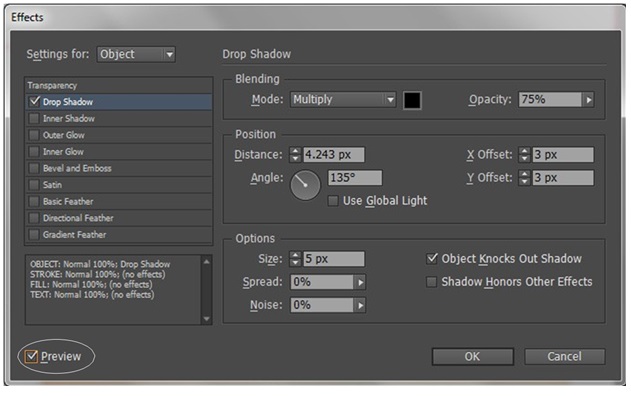
Experiment with the settings until you are satisfied. You can use more than one effect at a time, but don’t overdo it. Simpler is usually better.
If you see an effect on another book cover that you’d like to duplicate, find out how to achieve the effect by doing a bit of research. There are lots of tutorials online including LinkedIn Learning, for example, which is free through the library) and in books (also available for free at the library).
Trying Different Design Ideas
If you’re not completely satisfied with your cover design, try some other ideas. Add as many pages to your document as you need:
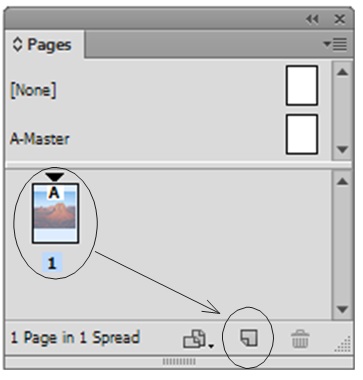
- Open the Pages panel in your dock at the right, and you’ll see your current book cover on page 1 (see right).
- It’s easiest to duplicate this whole design on a new page, so that you already have your type and image on the new page. To duplicate page 1, simply drag the page 1 icon onto the Create New Page icon at the bottom of the Pages panel.
- Now you’ll see pages 1 and 2 in your Pages panel, and they’ll look the same. Double-click on page 2 to start trying new fonts, colours, and effects. The layers and colours you made for your first attempt will remain in use. Feel free to add more layers and colours as you need them.
If you’d like to add a blank page to your document to start a new design from scratch, go into the fly- out menu on your Pages panel and choose Insert Pages. (The page you are currently on is indicated at the lower left of your screen.)
Exporting Your Book Cover to JPEG
Creating a Final JPEG of your Book Cover
Now you must save your file to a suitable format for ebooks (JPG or JPEG).
- First make sure you’ve saved your most recent work by clicking File > Save.
- Go to the Pages panel and double-click the page icon that holds your final cover design to take you to that page.
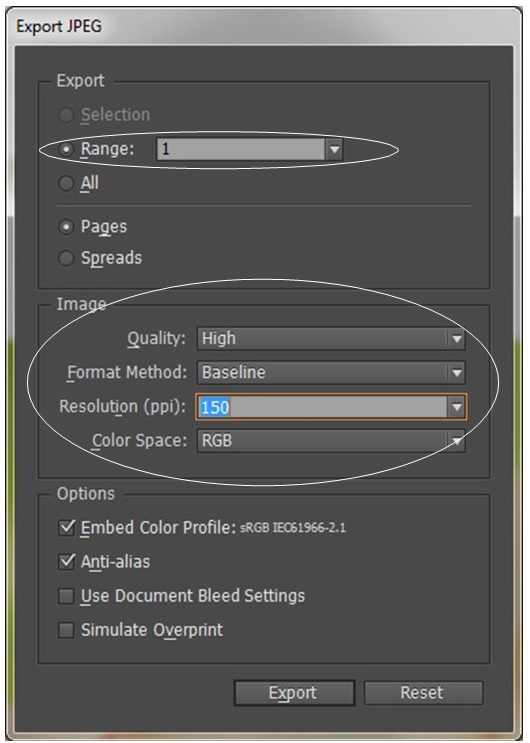
- Click File > Export, then choose JPEG from the Save as type drop-down menu. Type cover.jpg in the File Name box, then click Save. The Export JPEG dialog box will appear (see right).
- Make sure the Range box contains the page number of your final book cover.
- Use the settings shown to the right and click Export.
The resulting JPG is suitable for ebooks. You can find your cover JPG by looking for cover.jpg in Windows Explorer (click the folder icon at the bottom left of your screen and see it there—it’ll be saved on your USB memory stick).
You’ll see that your JPG’s file size is around 500 KB and its dimensions are 1600 × 2133 pixels. That size is suitable for use
in your ebook and also for uploading to ebook vendors such as Amazon.
Your memory stick should now have a folder called Book Cover containing your image, your InDesign file, and your cover.jpg file. Double-click the cover.jpg file in Windows Explorer to view it.
