Getting Started with FL Studio

Before starting a recording or editing project with FL Studio, it is a good idea to spend a few moments familiarizing yourself with the basic setup and layout of the workspace.
Learn FL Studio Layout and Workspace

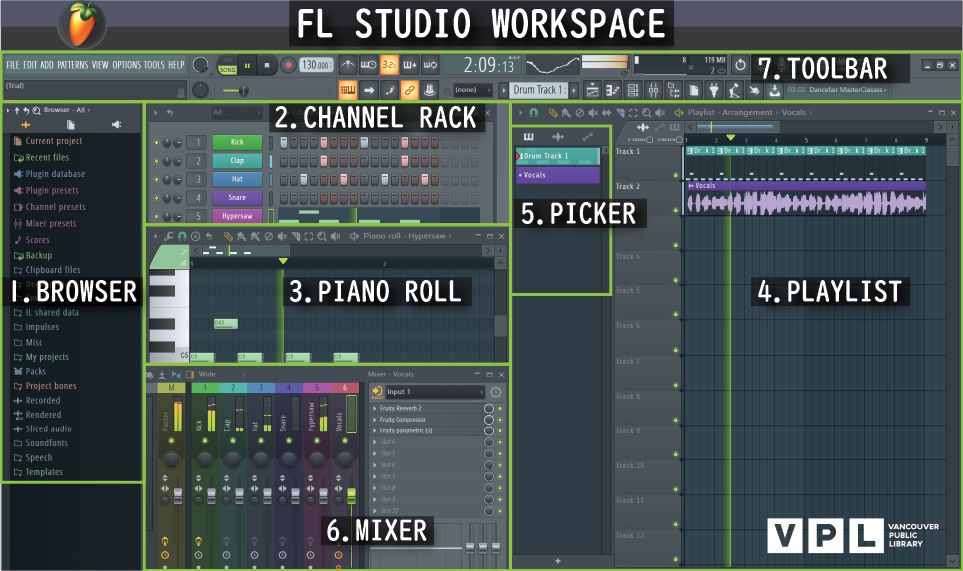
- Browser - provides access to instruments, samples, & plugins etc.
- Channel Rack - holds the samples and instruments that you select for your project. This is also where you create your musical patterns. Each pattern has access to the entire set of instruments / samples you have loaded. You can use the step sequencer here.
- Piano Roll - Write and sequence your drums and melodies in the Piano Roll. Control notes, length, velocity etc. These can be entered manually or recorded live from a MIDI device.
- Playlist - this is where you assemble all your patterns /audio clips into the structure of your song by layering and looping them.
- Picker - shows all patterns and clips in the project. Here you can select which is the active pattern for editing or importing into the playlist. Click and drag your pattern / clip from the Picker onto the Playlist.
- Mixer - use it to add effects, route audio, EQ and mix to instruments. All song audio is sent through the master channel.
- Toolbar: provides quick access to many tools and options; it also includes the
- Menu Bar: provides access to the main menus of FL Studio, including opening and saving projects.
- Transport & Recording Controls: controls playing, recording, and song tempo
- Toolbar Shortcut Icons: Shortcuts to open different windows or settings. Customizable.
Create or Load a Project
New Project
When starting a project, the very first thing to do is open the software. The icon looks like this:
Once open, FL Studio automatically creates a new project file for you, and is ready to start being used. Remember to save your project frequently!
Load a Project
Here are 2 ways to open a previously saved FL Studio project (.flp) to continue work on it
-
Double click your project file or drag the project file onto the FL Studio desktop icon
or you can
-
Open FL Studio and go File > Open > (locate your project file).
Learn the Basics of Operating FL Studio
In FL Studio, the workflow consists of creating musical patterns and then arranging them onto the playlist using tracks. Patterns can be created and edited either in the step sequencer area of the channel rack or the Piano Roll area. Here are some basic FL Studio functions:
Creating a Drum Beat in the Channel Rack's Step Sequencer
Tip: Left click adds a drum measure. Right click deletes a measure.

Name and Color an Existing Pattern
Right click on pattern name in the Pattern Selector, click Rename and Color (F2), type in name and select a color, click the check mark or hit the enter key.

Create a New Pattern
Click the + sign in the Pattern Selector. (F4) Name and color track as mentioned above.

Add an Instrument to the Channel Rack
Open Packs > Instruments > (one of the instruments)> drag sample onto the channel rack.

Open the Piano Roll
Right click on an Instrument, plugin or sample in the channel rack and select Piano Roll. To learn how to add notes, check out our MIDI section.

Label Tracks
Drag your pattern from the picker onto a track to assign the same name and color to the track. This is optional, but it does help with organization. You can actually put any pattern on any track, if you wanted.

Add and Arrange Patterns to Create a Song
Using the Paint tool, add and arrange your patterns to construct your song.
Tip: make sure to select the pattern you want to add before painting. Again, left click to add and right click to delete.

Switch Playback Mode to Song
To hear how the layers of patterns sound together, switch playback to Song mode and then hit the play button. You can switch it back to Pattern mode to edit individual patterns.

