Audio Editing with Audacity

This guide provides basic instructions on how to edit audio projects in Audacity.
Time Shift Tool
Clips in Audacity
The different lines in the Audacity window are known as "tracks".
On each track, there will be "clips".
Up until now, your mouse cursor has most likely been set to “Selection Tool”, which is the most common tool setting that you will be using. In this section, however, we will explore the “Time Shift Tool”, located in the toolbar just to the right of the basic controls:
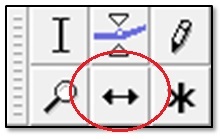
The "Time Shift Tool" is used to drag clips to different positions on the timeline.
Split Tool
Splitting Clips
When you import an audio file, it will be added to Audacity as a single track, which may contain two channels if the source file is in stereo. To split your track into two clips, use the Selection Tool to click on the track and select “Split” (Edit > Clip Boundaries > Split). You will now have two clips in the same track. This can be done multiple times to split your tracks into as many clips as you need to manipulate them effectively.
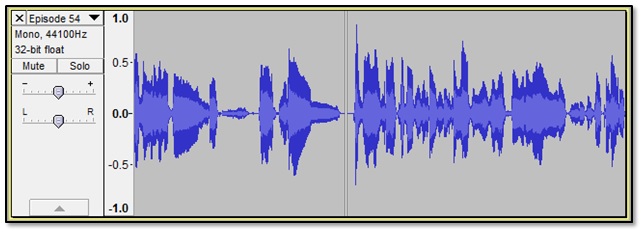
Using the Time Shift Tool, you can now drag the clips independently of each other:
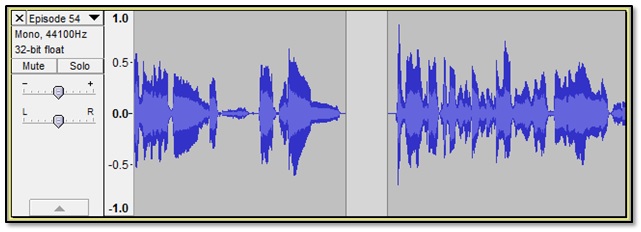
It gets even more powerful when you are working with multiple tracks. To try this out, add a new blank audio track (Tracks > Add New > Audio Track) and drag either of your clips to the new track:
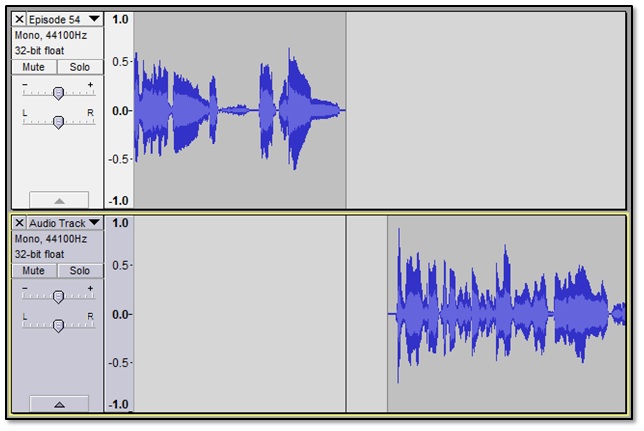
Another approach is to select part of your track (using the Selection Tool) and choose “Split New” (Edit > Clip Boundaries > Split New) to automatically add that clip to a newly-created track. Once you have split your audio into multiple clips and tracks, you can freely drag them around using the Time Shift Tool.
NOTE: the Time Shift Tool cannot be used to drag part of a Stereo track into another track unless that track has been split into two parts (which can be done using the individual track’s menu, by clicking the down arrow next to the filename and selecting “Split Stereo Track”)
Join Tool
Joining Clips
To join clips together, simply use the Selection Tool to select across a clip boundary (or several boundaries). Choose “Join” (Edit > Clip Boundaries > Join) to join the clips back together. If there is a gap between the clips, the space between them will be filled with silence.

Cut, Copy, Paste, Undo, Redo
Cut, copy and paste: These tools work similarly to the way they do in a word processor. You can select a portion of a track, cut it or copy it, and paste it into the same track or a new one.
- Cut: Ctrl X
- Copy: Ctrl C
- Paste: Ctrl V
Undo and Redo are your friends! You will make plenty of mistakes as you work on your project, but simply clicking Undo (Edit > Undo) will get you back to where you were. You can also use keyboard shortcuts: Ctrl Z will undo the last action, and Ctrl Shift Z to redo what was just undone. Many times, the only way to know how an effect will sound is to try it out. Don’t be afraid to experiment and Undo if you don’t like the results.
Adding Labels
Working with Labels in Audacity
If you end up making a lot of clips, it’s a good idea to label them so you can keep track of them. These can also be called “markers” or “regions”, but Audacity calls them labels.
So far, we have only dealt with one type of track, the Audio Track. Labels introduce us to a new type, called the Label Track. Simply select the point or region of the track that you want to label with the Selection Tool, and select Add Label At Selection (Tracks > Add Label At Selection).
The first time you do this, Audacity will create a Label Track for you (You can also do this manually by selecting Tracks > Add New > Label Track). Provide the label with a helpful name, and you’re done.
You can use the “handles” at either end of the label to adjust its size.
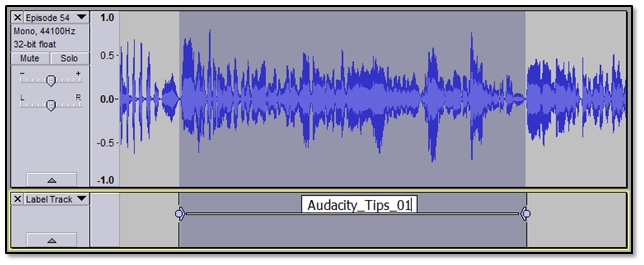
Keep in mind that these labels will come in especially handy when it comes to Exporting in the next section.
Trim and Silence
Trim Audio (Edit > Remove Special > Trim Audio) will remove everything else from a clip except for the part that is selected.
Silence Audio (Edit > Remove Special > Silence Audio) will set that selection to complete silence.
Volume Adjustments
To adjust the volume of an audio track, use the slider shown in the image below.

Panning
Use panning to adjust which side the audio on a track is played from, left or right. Most often you can leave this in the centre, but someone may pan tracks for projects such as a musical recording.

Mute/Solo
Muting a track silences it. You can mute multiple tracks, just one, or leave all of them unmuted.
Soloing a track mutes all other track except the track(s) soloed.

Envelope
In Audacity, every track has an "amplitude envelope" which is controlled with the Envelope Tool on the Tools Toolbar.
With the envelope tool in Audacity, you can make adjustments to the level of volume. You have great control and customization over the levels and can adjust it by using control points, indicating what the level should be at particular time.

